Lady Aga

Food and Cookery

Posts Tagged ‘AGA’

The Lady Aga’s “Spaghetti Carbonara” Recipe


Cooked this lovely dish tonight for the boys and Lauren! My eldest sons lovely girlfriend!

Had a trip to Liverpool Primarni!

Oh how I hate shopping!

My baby boy off on a flying school tomorrow for 2 weeks! packed with 2 great big portons of left over  carbonara! Will complete recipe tomorrow! tired now off to bed! Good night all.

The recipe at last!

Total cost approximately £3 – £4.00

Preparation and cooking time 20 minutes

Serves 4 – 6 average sized portions..depending on how hungry you are!

Ingredients

1 finely chopped red onion.

Olive oil for frying.

3 cloves of garlic (fresh preferably)

Double cream 50mls (optional)

3 eggs beaten

Poached egg per person to serve.

A handful of chopped parsley .

500 mgms chopped bacon (I always use bacon bits they are cheaper)

1 kilo of linguine or spaghetti.

Grated fresh Parmesan (optional but good)

Salt and pepper to season.

Lets get cooking………

Boil a large pan of water when bubbling add the pasta, stir for a minute so it doesn’t stick together.

Heat the olive oil and fry the bacon till cooked, add the onions, garlic and fry till soft.

Poach the eggs and drain on a plate ready for serving.

Drain the pasta and add the bacon, onion and garlic and black pepper, add the beaten eggs and cream and quickly mix and heat through thoroughly!

Serve with poached perched on top of a delicious pile of tasty carbonara and garnish with the finely chopped parsley and shaved parmesan. Season to taste.

I hope you enjoy this dish as much as we do! A quick easy dish to prepare!


Share

LADY AGA’S THAI SALAD RECIPE

AGA BARBY SUMMER OUTDOOR DINING COLLECTION

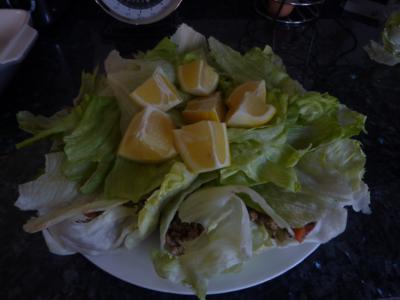
This is just a wonderful impressive dish. Fill each crunchy web lettuce leaf with the mixture and cover with the remaining lettuce to serve. It really is a delicious tasty dish with all the lovely Thai fragrant ingredients. Its quick, easy and looks great!

PREPARATION TIME

Approx 20 mins

For a healthier option use turkey mince and dry fry.

Approximate cost £4 – £6

All YOU NEED

Serves 4 people as a starter

500 mgms of pork or turkey mince.(turkey low fat option)

Olive oil (enough to fry mince)

1 lemons quartered

Web lettuce rinsed and leaves left whole

1 red chili finely chopped

2 finely chopped spring onions

Chopped lemon grass. ( 1whole stalk)

Seasoning to your taste

3 cloves of finely chopped  garlic

1/2 teaspoon of Nan Pla ( fish sauce)

1 teaspoon of soy sauce sauce (add more should you prefer)

Handful of fresh coriander

HOW TO PREPARE THIS LOVELY DISH

Fry the  mince thoroughly on the hot plate of the AGA, add garlic and chili for 2 mins, remove from heat and allow to cool, add chopped lemon grass, seasoning, soy sauce, nan pla, add the the chopped coriander and leave a little for decoration.

Mix and scoop on to individual  lettuce leaves, cover with remaining leaves and top with lemons ….to be squeezed on each portion!

Your guests can use their hands to fold their own filled lettuce leaf in to a parcel pick up and eat!

You will  love this dish its fresh fragrant and tastes just divine!

Enjoy!


Share

LADY AGA’S “Garlic and rosemary potatoes” recipe

FROM THE “AGA BARBY OUTDOOR DINING RECIPE COLLECTION”


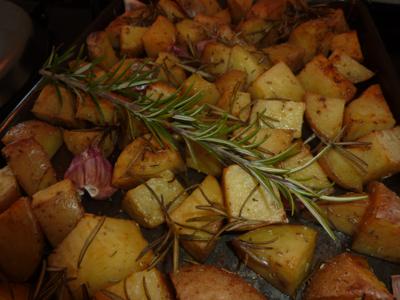
Great, simple and an easy dish, looks good and tastes great! I always make this dish when I have friends round in the summer.

In the winter months I often make them as an alternative to roast potatoes, serving them with a shoulder of lamb  big Sunday lunch!

I am very fortunate to have an endless supply of Rosemary in my garden! I recommend if  you don’t have a Rosemary plant and you enjoy the herb buy one! its looks pretty in little flower decorations for the table!


Preparation time 10 mins

Cooking time 25 – 30 mins

INGREDIENTS

As many as you require small  sized  potatoes wash and cut into quarters (can use whole baby new potatoes)

4 long big sprigs of Rosemary.

Several  cloves of garlic unpeeled and one whole bulb (optional)

Seasoning

Paprika

Olive oil

HOW TO IMPRESS

Wash and quarter potatoes and place on oiled baking tray, scatter unpeeled  garlic cloves, rosemary,  sprinkle with paprika, salt and black pepper. If you do go for the whole bulb place in the middle of the tray and drizzle with olive oil! when cooked it is like potato and just squeezes out of the skin.

Coat the potatoes with olive not to much or they will go mushy! Place in top hot  AGA oven for 10 to 15 mins make sure the potatoes are not sticking. Return to the  bottom AGA oven and roast till crispy round the edges and soft inside.

Tip don’t let them stick to the tray, keep an eye on them for the first few minutes.

Garnish with more fresh Rosemary and serve as a side dish or delicious on its own! YUM YUM!!

Share

LADY AGA’S “Chilli and ginger fiery dressing” recipe

AGA BARBY SUMMER OUTDOOR DINING COLLECTION

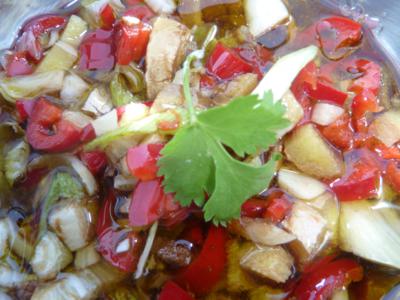
I first concocted this little dish a few years ago when I developed a love and an addiction for chillies and fresh ginger! Its quite strange and would appear to be definitely a girly dish.

I have progressed from a ramekin to a medium sized terracotta dish even then it never seems to be enough! It really does add a great kick to a meaty dish! Go for it!

Preparation time 10 mins

Cost from 60 pence to £1.50

INGREDIENTS

2 red chillies

2″ thick piece of fresh ginger

1/2 quantity of olive oi and balsamic vinegar (enough to cover and adjust to your taste)

Flat parsley, basil or  mint, whatever you have in the garden or on the kitchen windowsill thats edible  for garnish.

EASY PEASY PREPARATION

Finely chop the chillies seeds and all.

Finely chop fresh ginger (no need to peel)

Pour over balsamic and olive oil.

Done!

Serve along side anything! it will give and dish a great kick!


Share

LADY AGA’S TZATZIKI RECIPE

AGA BARBY SUMMER OUTDOOR DINING COLLECTION

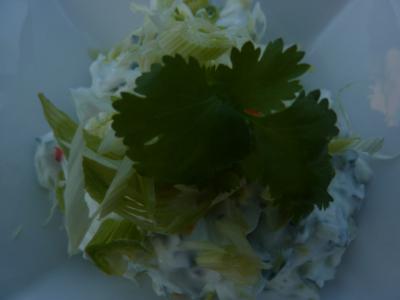
This little dish is a little gem and just perfect  served as an accompaniment to all the tasty dishes I prepare on the AGA  for a outdoor summer afternoon! Although mine usually last the entire weekend!

I always use the AGA to cook on as I find it easier, with some dishes  finished off on the barby to brown and griddle not wishing to deprive the men!


Preparation time 15 to 20mins

Cost approximately £2.50

For a reduced fat healthier version use light Greek yogurt and limit or no olive oil.

TZATZIKI  INGREDIENTS

1 whole fresh garlic bulb or to your own taste (dry bulb if unavailable)

1 whole cucumber peeled cored and grated.

500 mgms  of creamy Greek yogurt.

Salt to taste.

10 mls olive oil

Flat leaf parsley for decoration


HOW TO PREPARE

Peel the cucumber cut length ways and remove  the core.

Cut cucumber  in half and grate both halves (easier to grate in 2 pieces)j

Wrap in muslin and squeeze any  excess water out of the grated cucumber (optional)

Finely chop whole garlic bulb.

Mix all ingredients together.

Drizzle with a little olive oil.

Add the parsley garnish and serve with crusty bread  or as an accompaniment to the big summer AGA barby.


Best made a few hours before so the flavour of the garlic can permeate.

The fresh garlic has a much softer smell and taste unlike the garlic bulbs we are used to, so definitely worth the effort of sourcing it and it will keeps quite a while.

The tatziki will keep in the fridge sealed  up to 2 days. But I really don’t think you will have any left!

Share

Lamb Baked In Hay

Cooking lamb in a nest of fresh fragrant hay is a very old cooking method. It is very similar to French style of ‘En Papilotte’. The hay acts as a great insulator, keeping the heat in and giving a moist textured roast with a gentle grassy taste. Cooking in hay is something that would lend itself to a supper party, as it makes a great centre piece and an interesting talking point. However, you will need to get hold of some good clean hay, so perhaps you can chat up a local farmer! You will need to soak the hay before using – just swish it around in a bowl of cold water and then squeeze it out gently. Cooking in hay is especially brilliant if you have an Aga. The method is suitable for most large roasting joints but here I have used a boned, rolled leg.

Don’t worry if you are fresh out of hay! Just follow the method and either open roast your lamb or cover with foil. You might want to glug in half a bottle of red wine, so that the lamb braises and produces the base for a delicious gravy.

Serves 6-8

Ingredients

1 boned, rolled leg of lamb – approximately 2kg
8 Garlic cloves, peeled and sliced
Bunch of fresh rosemary – you will need to use the tips of the stalks
Salt and freshly ground black pepper
Vegetable oil
3-4 good handfuls of clean hay, soaked in cold water for 5-10 minutes and drained

Method

Pre-heat the oven to 220°C /Gas mark 7.

With a sharp knife make several deep incisions through the skin of the lamb, approximately 1cm. Push a slice of garlic, followed by a sprig of rosemary in each incision.

Put a layer of soaked and drained hay into a deep roasting tray and place the lamb on top.

Season with salt and pepper and drizzle with oil.

Cover the lamb with the remaining hay and cover with a piece of foil. Make sure there are no stray pieces of hay that might ignite.

Cook the lamb for approximately 2-2 ½ hours depending on the size of the leg.

Check the lamb is cooked your liking – if not, remove the foil and the covering of hay and continue to cook until done. Check by inserting a skewer into the thickest part and the juices should run clear. But as always, everyone has their own preference for ‘doneness’.

To serve, leave to rest for 15 minutes, remove the hay and carve.

Serve with Dauphinoise potatoes and a medley of young spring vegetables.

Antony Vila writes for the ultimate online food shopping outlet – Weetons.com. At Weetons.com, we’re all about bringing you the best locally sourced food & drink online. We have a huge selection of grocery products including award winning meats, cheeses and delicatessen food. Weeton’s is located at 23/24 West Park, Harrogate, HG1 1BJ, 01423 507 100

Article Source: http://EzineArticles.com/?expert=Antony_Vila

Article Source: http://EzineArticles.com/5093047


Share

Baking Tips For Cakes – Cake Baking Made Easy

So many cooks seem to be under a misapprehension that baking, and most especially cake baking is somehow very difficult. Almost as if there is some mystic art to baking and that you need to be a special kind of person, a ‘baker’ before your cakes will turn-out properly. It’s also true that other cooks approach baking almost obsessively. Treating the process as more of a science than an art, as they obsessively weigh-out each ingredient to the last gramme, afraid that if they don’t follow a recipe to the letter their cakes will never rise. Now it’s true that this approach will work, but it removes most of the fun from cooking. However, if you know a few rules then your cakes can and will rise perfectly each and every time.

The truth is that for a cake to work what you need is air in the mixture… lots of air…

But, before we get to how to make and bake a cake, here’s a brief history lesson. As it happens modern cakes (at least the way we bake them today) are a fairly recent invention, starting in Italy during the first half of the 18th century. By the 1740s these ‘Italian Style Cakes’ were all the rage in London. So, what had changed? Well, prior to the 1700s the traditional raising agent in cakes had been yeast. Cakes were, basically, just sweetened breads. However, with the new techniques yeast was replaced by beaten egg whites.

As yeast grows it converts sugar to alcohol and carbon dioxide and it’s these bubbles of carbon dioxide trapped in the batter or dough that makes a cake (and bread) rise. When you whip egg whites they become stiff and as they do so the protein molecules trap air inside them. When this matrix is baked the air expands and this causes the cake to rise.

In fact there’s nothing new in this process and it’s hardly surprising that the trend began in Europe. Indeed, the Romans used this very technique to make cakes and the traditional ‘Pan di Spagna’ (Spanish Bread) had been a staple of Sicilian cuisine for centuries.

The move from active yeast to whipped eggs was a major step-change in the way that cakes were made and baked. However, it was only during the Victorian era that modern cakes as we know them today began to be baked. Suddenly yeast fell out of fashion as the rising agent of choice and bicarbonate of soda (baking powder or baking soda) became all the rage. In fact, baking soda does a very similar job to yeast. In contact with acid or water and heat bicarbonate of soda breaks down to release carbon dioxide and it’s this gas, as it expands in the oven that makes a cake rise and gives the soft and fluffy texture that we all love.

Adding half a tablespoon of ‘bicarb’ to finely-milled flour before making a cake became all the rage. So much so that flour manufacturers began to add it to flour themselves, so that self-raising flour (sometimes also known as cake flour) was born. But if you don’t have any just add half a teaspoon of baking powder per 200g of ordinary plain flour.

At its heart a cake is a creamed blend of butter (or margarine) and sugar to which eggs and flour are added before baking. The secret to any cake is to do everything thoroughly and to add as much air to the mixture as possible.

The incorporation of air begins with the first process involved in making cakes: that of creaming together the butter (or margarine) and sugar. Do this vigorously… and when the recipe asks you to cream until pale and creamy do just that. The mixture really should be paler than when you started and the butter should be soft and the sugar completely incorporated into it. Also, beat as vigorously as you can, as this is the first stage into which you can incorporate air into the batter.

Next, in most classic cake batters you typically add eggs to the batter. These make the batter more liquid but they also act as the scaffold for the final baked cake to hold its shape and they also add flavour. It’s the protein in the egg (the egg whites) that provide the structure and the fats (the egg yolks) that add the flavour. When incorporating the eggs into the creamed butter always use lightly-beaten eggs and always incorporate just a little of the egg at a time. The more thoroughly you can combine the eggs with the butter mix the better your resulting cake mix will be. After all, it’s the butter that makes the cake moist and it’s the eggs that let it hold it’s shape.

However, in terms of the cake’s actually rising in the oven perhaps the most important factor in making the cake is the flour. Always use the best and finest flour you can. Use self-raising for convenience, but plain flour to which baking powder has been added also works. When using flour always sift it into a bowl before use. This removes any lumps it also separates the flour particles. This both introduces more air into the cake mixture but also means that each flour particle can be coated into the butter mix and will hold itself better in the cake. You’re also getting rid of any static charges that may hold the flour particles together and give you a lump of raw flour in the middle of the cake.

To add the flour to the egg and butter mix tip the flour in then fold into the egg mixture, do not stir. This means that instead of using a round and round stirring motion (which acts to remove air from the batter) you’re using and up and down motion, which actively puts more air into the mix and gives you a lighter cake in the end. At this point, never, ever, leave the cake sitting as the bicarbonate of soda in the flour is already being converted into carbon dioxide and the quicker you get the cake in the oven the better and more well risen it will be.

Typically you would use a moderate oven (170°C

Dyfed Lloyd Evans is the creator of the Recipes Archive where he presents a large selection of Cake and Baking Recipes. Now that you know the secrets of perfect baking, why not fetch some recipes and try your hand at cake making today!

Article Source: http://EzineArticles.com/?expert=Dyfed_Lloyd_Evans

Article Source: http://EzineArticles.com/1270646


Share

Strawberry Fools

The season for English strawberries is short and sweet. The jewel in the crown of summer fruits needs to be treated with respect and devotion.

Probably one of the earliest packaged foods, sold in the 16th century in cone-shaped baskets, regarded in medieval times as an aphrodisiac and by the Romans as a cure for melancholy and bad breath, this is a fruit to be treasured.

Eaten freshly picked from your garden with lashings of clotted cream or liberally doused with black pepper to draw out their flavour, strawberry recipes that can lengthen the intensity of that first taste of summer are a must for a discerning cook.

Some of my favourites are: Strawberry curd, an excellent change from the more traditional lemon curd, Dried strawberries, a delicious reminder of summer on your winter breakfast cereal,Strawberry ice-cream, naughty but nice at any time of the year, and Strawberry vodka, bliss served at Christmas.


  • Strawberry Curd: preparation time 15 minutes; cooking time 35mins Makes approx. 650g. 200g strawberries Finely grated zest of 1 orange Finely grated zest and juice of 1 lemon 250g castor sugar 120g unsalted butter 4 good quality eggs Wash dry and hull strawberries, puree fruit (sieve out pips optional). Put puree in the top of a ban-marie or in a bowl on top of a pan of simmering water. Add butter, orange and lemon and the sugar. Beat the eggs and add together the ingredients. Cook, stirring until sugar dissolves; continue cooking, stirring regularly, until the mixture thickens. Pour curd into warm sterile jars, cover with a cloth and leave until cold before sealing with lids. Curd will keep for a couple of months if kept refrigerated.
  • Dried Strawberries Use ripe undamaged fruit and cut the berries into even thickness slices, approx. 50mm. Place slices in a single layer without touching each other on lined baking trays. Dry in oven at lowest setting , works very well in coolest oven of an Aga, takes about 12 hours. When completely cool store in airtight containers in cool dark place. Warning make sure fruit is completely dried before storing.
  • Strawberry ice-cream Serves 6 Ripe fruit full of flavour is essential for this recipe 340g ripe strawberries hulled Juice of 1 orange and 1 lemon 170g castor sugar 420ml whipping cream Rub berries through a sieve or process briefly in a blender or food processor and strain the puree. Combine puree with orange and lemon juice and sugar. Set mixture aside for about 2 hours to intensify the flavour Whip cream until it holds in soft peaks combine with puree whisking lightly together. Freeze in an ice-cream maker following manufacturer’s instructions.
  • Strawberry vodka Hull enough strawberries to fill a preserving jar or wide necked bottle of your choice Chop fruit or prick berries with a darning needle and put in jar or bottle. Add enough castor sugar to cover about a third of the berries and top up with vodka. The sweetness of this liqueur is a matter of personal choice so experiment with quantities of sugar to fruit – enjoy. Close bottle and keep in cool dark spot for at least a month shaking from time to time to dissolve the sugar. Strain and rebottle and if you are feeling generous give away as Christmas presents as long as you keep a couple for yourself.


Compiled by Jackie Miller – Colliers Hill

Colliers Hill is the ideal venue for your conference, off-site meeting, product launches or just somewhere to meet away from the madding crowd. If you are planning an up-coming event that you want to base around a particular theme, then contact Jackie at Colliers Hill on 0044 (0)1299 832 247 – she will be delighted to help you with your planning.

Article Source: http://EzineArticles.com/?expert=Jackie_W._Miller

Article Source: http://EzineArticles.com/41529


Share

The Secret of a Perfect Yorkshire Pudding

For more years than I care to remember, along with many, many other British people I struggled to make the perfect Yorkshire Pudding. A classic British accompaniment to roast beef, traditionally served for Sunday lunch, with all the family, but delicious served with any cooked meat. We British tend to copy other people’s recipes for this dish, believing that they have the secret to a perfectly risen pudding. Unfortunately it doesn’t work like that.

The reasons are we all have a slightly different heat in our ovens; we all use slightly different egg sizes, different flour and so on.

Just by luck I happened to be chatting away to a taxi driver coming home one day from work whose previous job was a chef.

He gave me his version of the illusive pudding. I tried it. It worked. That was 15 years ago.

I’ve since cooked it in every oven available to man, including Aga cookers with no heat dials. It never fails.
The secret is simple: just make sure all the ingredients measure the same, there’s no weighing involved.

Set the oven to its highest heat.
Put 1 tsp of oil into each bun hole (4 bun holes for this recipe)
When oven has reached its highest temperature, pop the bun tin in the oven on the highest shelf to heat up.

Meanwhile make the batter.

1 Egg

Plain (all purpose flour)

Semi skimmed milk

4 tsp Olive oil

Using a small cup, break the egg into it.
Take note of where it comes up to in the cup.
Mark the outside of the cup if it helps.
Tip the egg into a mixing bowl.
Now pour the milk up to the same “egg line”.
Tip into the mixing bowl.
Do the same procedure with the flour.

Whisk all three ingredients on fast speed with electric whisk or mixer.
Pour 4 equal amounts into a hot pudding or muffin tin.
Bake for 15-20 minutes in a hot oven on the top shelf

(the highest temperature your oven has)
Make sure you leave room in the oven for the puddings to rise.

Puddings should be well risen, light, fluffy and crispy round the edges.

“Lesley Jones is just one half of the duo that makes CookingWithTheJoneses such a great place for finding delicious food recipes, and other ‘foodie’ information. She and her husband Barry, love cooking, and have been into creating amazing food for over 15 years. If you have any ‘foodie’ questions, or would like to recommend a new recipe – visit http://www.CookingWithTheJoneses.com and let Lesley and Barry help you.”

Article Source: http://EzineArticles.com/?expert=Lesley_Jones

Article Source: http://EzineArticles.com/1580616


Share

Homemade Fruit Cake

Many of my guests tell me that the decision making factor on my website was the promise of homemade fruitcake on demand.

The cake sits between the rooms and guests can help themselves whenever a dose of the munchies hits them – though I was surprised to see 2 pieces disappear last week between going down to start on breakfast at 7.00am and popping upstairs again at 7.15!

I started with an AGA fruitcake recipe and have adapted it over the years to my own.

Now the funny thing is I really do not like fruitcake and have never tasted my own. It is one of the reasons I cook it as otherwise I would be double the size I am already – luckily I have a willing tester in my husband.

As my B&B guests seemed to be enjoying it so much and were pigging out for free I decided it was the ideal opportunity to raise some money for our local Community Hospital, so I had some recipe postcards made up which I invite fruit cake loving guests to buy in return for a donation.So now your turn to contribute. I have copied my secret fruit cake recipe below.

If you try it then please donate a small amount to the charity of your choice – Calories without guilt – perfect.

Enjoy

12oz mixed fruit

9oz self raising flour

6oz butter melted

6oz sugar ( caster, brown whatever )

2tsps of cinnamon or mixed spice

1tbs marmalade

6 eggs ( free range only please )

Mix together dry ingredients with the marmalade. Add eggs and butter and mix well

Line two 1lb loaf tines or one 8inch round cake tin with silicon paper ( I use those cake tin liners you just pop in – perfect and very quick ).

Put in cake mix and cook in the bottom of the AGA for 1.5 – 2.5 hours.

Sorry I can not be more exact but the timing varies ( and it has taken about 30 seconds to prepare so far – so a little attention now is no bad thing! ) – you are looking for just cooked and slightly squidgy. Slightly springy when you press the middle but not rock hard.

If you do not have an AGA then a conventional oven at about 140 degrees C should do it

Karen Thorne runs the award winning Hopton House Bed and Breakfast in the beautiful South Shropshire countryside. http://www.shropshirebreakfast.co.uk/

If you’re looking to run your own bed and breakfast in the UK, then save yourself time, effort and money by checking out our training courses and free resources at http://www.bedandbreakfastacademy.co.uk/ Everything you need to know to Set Up, Run and Market your own successful B&B business.

Article Source: http://EzineArticles.com/?expert=Karen_Thorne

Article Source: http://EzineArticles.com/910460


Share