Lady Aga

Food and Cookery

Posts Tagged ‘cooking’

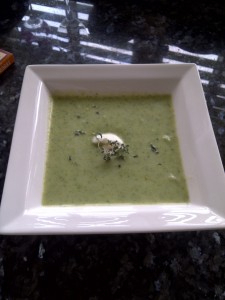
The Lady Aga’s Autumn recipe for Broccoli and Castello Blue Soup

Broccoli and Castello Blue soup
Quick, easy, healthy and delic!


The Lady Aga’s Broccoli and Castello Blue Soup

I made this as my local Waitrose had Packs of broccoli for 19 pence each!  Bargain! I do tend to cook what is reduced, this is OK as long as you cook it or freeze it straight away!

TAKES 15 MINUTES

SERVES 4 TO SIX

APPROXIMATE COST £2.00  TO  £4.00 depending on cost and choice of ingredients.

INGREDIENTS

500 grms broccoli trim and separate florets.

2 large potatoes peeled and cut into small pieces.

1 onion peeled and roughly chopped.

100 grms of blue cheese (I don’t use stilton as it can be too strong)

150 mls of chicken stock or vegetable stock, cubes are easy!

Salt ground black pepper (salt according to how strong the cheese is taste first)

150 mls of milk

Little dollop of Philadelphia to serve (optional)

HOW WE MAKE THIS GEM

Boil the onions and potatoes and thick part of the broccoli stalks in just enough water/stock to cover.

Boil for 10 minutes then add the broccoli florets, don’t add anymore water cover pan with lid and the broccoli will steam.

Steam for about 5 minutes add cheese pepper.

Remove from heat and blend with a hand held blender till smooth.

Add milk and salt according to taste and preferred  consistency.

T0 serve add a dollop of Philadelphia and chunk of crusty bread to dip in!

For a little twist

Add a dash of balsamic vinegar

Cream instead of Philadelphia to serve.

ENJOY 


Share

Lamb Baked In Hay

Cooking lamb in a nest of fresh fragrant hay is a very old cooking method. It is very similar to French style of ‘En Papilotte’. The hay acts as a great insulator, keeping the heat in and giving a moist textured roast with a gentle grassy taste. Cooking in hay is something that would lend itself to a supper party, as it makes a great centre piece and an interesting talking point. However, you will need to get hold of some good clean hay, so perhaps you can chat up a local farmer! You will need to soak the hay before using – just swish it around in a bowl of cold water and then squeeze it out gently. Cooking in hay is especially brilliant if you have an Aga. The method is suitable for most large roasting joints but here I have used a boned, rolled leg.

Don’t worry if you are fresh out of hay! Just follow the method and either open roast your lamb or cover with foil. You might want to glug in half a bottle of red wine, so that the lamb braises and produces the base for a delicious gravy.

Serves 6-8

Ingredients

1 boned, rolled leg of lamb – approximately 2kg
8 Garlic cloves, peeled and sliced
Bunch of fresh rosemary – you will need to use the tips of the stalks
Salt and freshly ground black pepper
Vegetable oil
3-4 good handfuls of clean hay, soaked in cold water for 5-10 minutes and drained

Method

Pre-heat the oven to 220°C /Gas mark 7.

With a sharp knife make several deep incisions through the skin of the lamb, approximately 1cm. Push a slice of garlic, followed by a sprig of rosemary in each incision.

Put a layer of soaked and drained hay into a deep roasting tray and place the lamb on top.

Season with salt and pepper and drizzle with oil.

Cover the lamb with the remaining hay and cover with a piece of foil. Make sure there are no stray pieces of hay that might ignite.

Cook the lamb for approximately 2-2 ½ hours depending on the size of the leg.

Check the lamb is cooked your liking – if not, remove the foil and the covering of hay and continue to cook until done. Check by inserting a skewer into the thickest part and the juices should run clear. But as always, everyone has their own preference for ‘doneness’.

To serve, leave to rest for 15 minutes, remove the hay and carve.

Serve with Dauphinoise potatoes and a medley of young spring vegetables.

Antony Vila writes for the ultimate online food shopping outlet – Weetons.com. At Weetons.com, we’re all about bringing you the best locally sourced food & drink online. We have a huge selection of grocery products including award winning meats, cheeses and delicatessen food. Weeton’s is located at 23/24 West Park, Harrogate, HG1 1BJ, 01423 507 100

Article Source: http://EzineArticles.com/?expert=Antony_Vila

Article Source: http://EzineArticles.com/5093047


Share

Baking Tips For Cakes – Cake Baking Made Easy

So many cooks seem to be under a misapprehension that baking, and most especially cake baking is somehow very difficult. Almost as if there is some mystic art to baking and that you need to be a special kind of person, a ‘baker’ before your cakes will turn-out properly. It’s also true that other cooks approach baking almost obsessively. Treating the process as more of a science than an art, as they obsessively weigh-out each ingredient to the last gramme, afraid that if they don’t follow a recipe to the letter their cakes will never rise. Now it’s true that this approach will work, but it removes most of the fun from cooking. However, if you know a few rules then your cakes can and will rise perfectly each and every time.

The truth is that for a cake to work what you need is air in the mixture… lots of air…

But, before we get to how to make and bake a cake, here’s a brief history lesson. As it happens modern cakes (at least the way we bake them today) are a fairly recent invention, starting in Italy during the first half of the 18th century. By the 1740s these ‘Italian Style Cakes’ were all the rage in London. So, what had changed? Well, prior to the 1700s the traditional raising agent in cakes had been yeast. Cakes were, basically, just sweetened breads. However, with the new techniques yeast was replaced by beaten egg whites.

As yeast grows it converts sugar to alcohol and carbon dioxide and it’s these bubbles of carbon dioxide trapped in the batter or dough that makes a cake (and bread) rise. When you whip egg whites they become stiff and as they do so the protein molecules trap air inside them. When this matrix is baked the air expands and this causes the cake to rise.

In fact there’s nothing new in this process and it’s hardly surprising that the trend began in Europe. Indeed, the Romans used this very technique to make cakes and the traditional ‘Pan di Spagna’ (Spanish Bread) had been a staple of Sicilian cuisine for centuries.

The move from active yeast to whipped eggs was a major step-change in the way that cakes were made and baked. However, it was only during the Victorian era that modern cakes as we know them today began to be baked. Suddenly yeast fell out of fashion as the rising agent of choice and bicarbonate of soda (baking powder or baking soda) became all the rage. In fact, baking soda does a very similar job to yeast. In contact with acid or water and heat bicarbonate of soda breaks down to release carbon dioxide and it’s this gas, as it expands in the oven that makes a cake rise and gives the soft and fluffy texture that we all love.

Adding half a tablespoon of ‘bicarb’ to finely-milled flour before making a cake became all the rage. So much so that flour manufacturers began to add it to flour themselves, so that self-raising flour (sometimes also known as cake flour) was born. But if you don’t have any just add half a teaspoon of baking powder per 200g of ordinary plain flour.

At its heart a cake is a creamed blend of butter (or margarine) and sugar to which eggs and flour are added before baking. The secret to any cake is to do everything thoroughly and to add as much air to the mixture as possible.

The incorporation of air begins with the first process involved in making cakes: that of creaming together the butter (or margarine) and sugar. Do this vigorously… and when the recipe asks you to cream until pale and creamy do just that. The mixture really should be paler than when you started and the butter should be soft and the sugar completely incorporated into it. Also, beat as vigorously as you can, as this is the first stage into which you can incorporate air into the batter.

Next, in most classic cake batters you typically add eggs to the batter. These make the batter more liquid but they also act as the scaffold for the final baked cake to hold its shape and they also add flavour. It’s the protein in the egg (the egg whites) that provide the structure and the fats (the egg yolks) that add the flavour. When incorporating the eggs into the creamed butter always use lightly-beaten eggs and always incorporate just a little of the egg at a time. The more thoroughly you can combine the eggs with the butter mix the better your resulting cake mix will be. After all, it’s the butter that makes the cake moist and it’s the eggs that let it hold it’s shape.

However, in terms of the cake’s actually rising in the oven perhaps the most important factor in making the cake is the flour. Always use the best and finest flour you can. Use self-raising for convenience, but plain flour to which baking powder has been added also works. When using flour always sift it into a bowl before use. This removes any lumps it also separates the flour particles. This both introduces more air into the cake mixture but also means that each flour particle can be coated into the butter mix and will hold itself better in the cake. You’re also getting rid of any static charges that may hold the flour particles together and give you a lump of raw flour in the middle of the cake.

To add the flour to the egg and butter mix tip the flour in then fold into the egg mixture, do not stir. This means that instead of using a round and round stirring motion (which acts to remove air from the batter) you’re using and up and down motion, which actively puts more air into the mix and gives you a lighter cake in the end. At this point, never, ever, leave the cake sitting as the bicarbonate of soda in the flour is already being converted into carbon dioxide and the quicker you get the cake in the oven the better and more well risen it will be.

Typically you would use a moderate oven (170°C

Dyfed Lloyd Evans is the creator of the Recipes Archive where he presents a large selection of Cake and Baking Recipes. Now that you know the secrets of perfect baking, why not fetch some recipes and try your hand at cake making today!

Article Source: http://EzineArticles.com/?expert=Dyfed_Lloyd_Evans

Article Source: http://EzineArticles.com/1270646


Share

The Secret of a Perfect Yorkshire Pudding

For more years than I care to remember, along with many, many other British people I struggled to make the perfect Yorkshire Pudding. A classic British accompaniment to roast beef, traditionally served for Sunday lunch, with all the family, but delicious served with any cooked meat. We British tend to copy other people’s recipes for this dish, believing that they have the secret to a perfectly risen pudding. Unfortunately it doesn’t work like that.

The reasons are we all have a slightly different heat in our ovens; we all use slightly different egg sizes, different flour and so on.

Just by luck I happened to be chatting away to a taxi driver coming home one day from work whose previous job was a chef.

He gave me his version of the illusive pudding. I tried it. It worked. That was 15 years ago.

I’ve since cooked it in every oven available to man, including Aga cookers with no heat dials. It never fails.
The secret is simple: just make sure all the ingredients measure the same, there’s no weighing involved.

Set the oven to its highest heat.
Put 1 tsp of oil into each bun hole (4 bun holes for this recipe)
When oven has reached its highest temperature, pop the bun tin in the oven on the highest shelf to heat up.

Meanwhile make the batter.

1 Egg

Plain (all purpose flour)

Semi skimmed milk

4 tsp Olive oil

Using a small cup, break the egg into it.
Take note of where it comes up to in the cup.
Mark the outside of the cup if it helps.
Tip the egg into a mixing bowl.
Now pour the milk up to the same “egg line”.
Tip into the mixing bowl.
Do the same procedure with the flour.

Whisk all three ingredients on fast speed with electric whisk or mixer.
Pour 4 equal amounts into a hot pudding or muffin tin.
Bake for 15-20 minutes in a hot oven on the top shelf

(the highest temperature your oven has)
Make sure you leave room in the oven for the puddings to rise.

Puddings should be well risen, light, fluffy and crispy round the edges.

“Lesley Jones is just one half of the duo that makes CookingWithTheJoneses such a great place for finding delicious food recipes, and other ‘foodie’ information. She and her husband Barry, love cooking, and have been into creating amazing food for over 15 years. If you have any ‘foodie’ questions, or would like to recommend a new recipe – visit http://www.CookingWithTheJoneses.com and let Lesley and Barry help you.”

Article Source: http://EzineArticles.com/?expert=Lesley_Jones

Article Source: http://EzineArticles.com/1580616


Share

Homemade Fruit Cake

Many of my guests tell me that the decision making factor on my website was the promise of homemade fruitcake on demand.

The cake sits between the rooms and guests can help themselves whenever a dose of the munchies hits them – though I was surprised to see 2 pieces disappear last week between going down to start on breakfast at 7.00am and popping upstairs again at 7.15!

I started with an AGA fruitcake recipe and have adapted it over the years to my own.

Now the funny thing is I really do not like fruitcake and have never tasted my own. It is one of the reasons I cook it as otherwise I would be double the size I am already – luckily I have a willing tester in my husband.

As my B&B guests seemed to be enjoying it so much and were pigging out for free I decided it was the ideal opportunity to raise some money for our local Community Hospital, so I had some recipe postcards made up which I invite fruit cake loving guests to buy in return for a donation.So now your turn to contribute. I have copied my secret fruit cake recipe below.

If you try it then please donate a small amount to the charity of your choice – Calories without guilt – perfect.

Enjoy

12oz mixed fruit

9oz self raising flour

6oz butter melted

6oz sugar ( caster, brown whatever )

2tsps of cinnamon or mixed spice

1tbs marmalade

6 eggs ( free range only please )

Mix together dry ingredients with the marmalade. Add eggs and butter and mix well

Line two 1lb loaf tines or one 8inch round cake tin with silicon paper ( I use those cake tin liners you just pop in – perfect and very quick ).

Put in cake mix and cook in the bottom of the AGA for 1.5 – 2.5 hours.

Sorry I can not be more exact but the timing varies ( and it has taken about 30 seconds to prepare so far – so a little attention now is no bad thing! ) – you are looking for just cooked and slightly squidgy. Slightly springy when you press the middle but not rock hard.

If you do not have an AGA then a conventional oven at about 140 degrees C should do it

Karen Thorne runs the award winning Hopton House Bed and Breakfast in the beautiful South Shropshire countryside. http://www.shropshirebreakfast.co.uk/

If you’re looking to run your own bed and breakfast in the UK, then save yourself time, effort and money by checking out our training courses and free resources at http://www.bedandbreakfastacademy.co.uk/ Everything you need to know to Set Up, Run and Market your own successful B&B business.

Article Source: http://EzineArticles.com/?expert=Karen_Thorne

Article Source: http://EzineArticles.com/910460


Share

Seville Orange Marmalade

Homemade marmalade is a real treat and loved by B&B guests. And the very best of marmalades is that made with seville oranges.

These days you can buy just about every fruit and vegetable all year round, but seville oranges seem to be the one fruit that you can still only buy in season.

So in January start looking out for these bitter oranges in your local greengrocers. They are in season through to February. I get very excited when they first appear, buying kilos of them to make the hundreds of jars of marmalade I get through at the B&B in a year. However after my 3rd batch I get bored of marmalade making.

I was explaining this dilemma to my lovely neighbours, Olive and Doreen, when they provided me with the solution. Seville oranges freeze beautifully. You don not need to anything with them apart from wash them, stick them in a bag and out them in the freezer. When you run out of marmalade you fcan cook them from frozen as per the recipe below.

My husband likes dark marmalade. To achieve this I replace 6oz of the white sugar with 6 oz of dark muscovado sugar. The great thing about this recipe is because it is made in 2 batches you could make half ordinary marmalade and half muscovado marmalade.

A few tips:

Seville Orange Marmalade


  • Make sure you have a really large preserving pan. The marmalade does boil up to twice its volume when it’s going at full boil.
  • Ensure you have a really hot heat to get it to boil properly ( the first time I cooked it it took 6 hours to get to boiling point because my AGA hot plate was not hot enough )
  • Allow a whole afternoon to do it. You can not rush the process. I prefer a cold gloomy day when there is a good black and white movie I can watch on the kitchen tv
  • 1kg Seville Oranges
  • Juice and pips of 2 lemons
  • 2kg granulated sugar
  • 3 pints of water


Put the sugar somewhere to warm. The airing cupboard will do nicely.

Put the oranges and lemon juice and pips into a large pan.

Pour in 3 pints of cold water. Add a bit extra if it does not cover the oranges.

Bring to the boil, then pop on the lid and simmer at the lowest heat possible for 2 hours or until the oranges are soft. You can also put them in a low oven or bottom of the AGA if you have one.

When the oranges are tender. Put a colander over a large deep plate and put the oranges into drain, leaving the cooking liquid in the pan for now.

When they have cooled enough to handle, cut the oranges in half and scoop out all of the pith and pips into the liquid in the pan.

Bring to the boil for 7 minutes with the lid off.

Strain the liquid through a sieve, pressing it through with a spoon. You need as much of this thick liquid as possible as it is full of pectin which will make the marmalade set.

You now put half of the liquid into a large preserving pan.

Put 1 kilo of the warmed sugar into the pan.

Cut the peel into strips – as thin or as thick as you like ( this is much easier when the oranges are cooked than when doing it raw ). Add half of the peel to the pan.

Heat the liquid, sugar and peel until all of the sugar as dissolved. Then increase the temperature until it is boiling and will not calm down even when you stir it. Then boil rapidly for 15-20 minutes.

Test for a set by putting a teaspoon of marmalade on a plate that has been on the freezer. If it is setting then, after a minute, it will wrinkle up when you pull your finger through it.

Leave for 10 minutes then put into warm sterilised glass jars ( the easiest way to sterilise the jars is by putting them in the dishwasher on the hottest setting. If you don not have time to do this then fill them half full of water then put them in the microwave on full power until the water has boiled for at least a minute ).

I always use screw cap lids, which you can buy on the internet – much less hassle then waxed paper and cellophane. Put the screw caps on as soon as the marmalade is in the jar, then label with the date when cool.

Repeat the whole process with the other half of the liquid, peel and sugar.

This recipe will make about 7 or 8 1lb jars of marmalade.

Karen Thorne runs the award winning Hopton House Bed and Breakfast in the beautiful South Shropshire countryside. http://www.shropshirebreakfast.co.uk/

If you’re looking to run your own bed and breakfast in the UK, then save yourself time, effort and money by checking out our training courses and free resources at http://www.bedandbreakfastacademy.co.uk/ Everything you need to know to Set Up, Run and Market your own successful B&B business.

Article Source: http://EzineArticles.com/?expert=Karen_Thorne

Article Source: http://EzineArticles.com/910185


Share

DIY AGA Service – Keeping Your AGA’s Performance Up to Scratch

AGAs and Rayburns are marvellously solid beasts. They’re made to last… for a long, long time. So while you might not bother giving your ordinary cooker a service, keeping a range in tip top condition is well worth the effort. So how much can you do yourself? And when is the best time to get an expert on the case?

First, there’s the lovely, shiny vitreous enamel surface. Obviously it makes sense to mop up spills as they happen rather than let them mount up and form a nasty crust, both for appearance’s sake and for good maintenance.

You can clean your oven’s enamel surface when it’s cold or hot. There’s no need for fancy cleaning materials. You can’t go far wrong with washing up liquid, warm water and a soft cloth. An old square of towelling is ideal because it protects you from the heat if you’re cleaning your machine while it’s on and stays moist longer than a regular cleaning cloth. If you prefer to use a specialist cleaning fluid make sure it’s non-scratch or you’ll spoil the surface.

You can clean the chrome surfaces the same way, with warm soapy water, or use a specialist chrome cleaner. And the flue and vent cover also respond well to a warm soapy cloth. Inside, AGA oven lids are made of pressed aluminium. This comes clean with a mild non-scratch cream cleaner on a nylon – not wire wool – scouring pad.

AGA cooking tends to bake spills onto the inside of the oven. But that’s no problem. Most of the time you can easily brush crusty spills off the inside with a stiff brush. Or use your hoover when your oven is cool to scrape off and dispose of burnt-on food efficiently. The most important thing to remember is don’t experiment! Money-saving cleaners like ordinary household vinegar and lemon juice are no good and can seriously damage the enamel.

For anything other than cleaning it’s best to get an expert in for a proper AGA service. The same goes for Rayburns. An expert will know how to remove, clean and re-fit the hinged lids without damaging them, sweep the flue if necessary, remove stubborn deposits and take the central hob out for cleaning. And they’ll know how to do so safely without damage to their backs or your enamel!

Some say once a year is ideal. But in reality it probably depends on the way you use your oven. Heavy usage usually means heavier wear and more frequent servicing. Exercise common sense and you won’t go far wrong! If in doubt ask your dealer.

If you’re not sure where to turn for an Aga service, or just need some advice on Aga cooking, try Edwards & Godding for fast and reliable help and advice.

Article Source: http://EzineArticles.com/?expert=Robert_Craythorne

Article Source: http://EzineArticles.com/6055887


Share

Electric, Gas or Oil Aga? Aga Cookers for Every Situation

Will an electric Aga, gas Aga or oil Aga be best for you and your home? It depends entirely on your needs. But it’s always best to get an expert on the case.

The newest addition to the range is their 13amp electric model. There’s an amazing new remote control management system too, called AIMS, which is fitted automatically to the new-style electric Aga. In effect it’s actually ‘intelligent’, in that you can set it to come on and off to suit the way you run your home. And it’s wonderfully easy to install. A two-oven Aga without water heating will probably consume around 165 KW per week. A three oven model without hot water consumes about 190 KW a week and the version with 4 ovens, also without heated water, consumes around 200 KW of electricity per week.

There’s also the traditional off peak electric Aga, the good old 30amp model that’s been a valuable and well loved member of the Aga family for more than two decades. It’s remarkably energy efficient because it acts like a massive battery, storing low cost, off peak power for you to use any time you like. You can expect to use around 224 KW per week if you fit a two oven model without water heating, around 273 KW per week for a four-oven version that doesn’t heat water.

You can also buy a gas Aga or Propane Aga. Gas Agas are famous for burning extremely cleanly. You can fit a conventional flue, a powered flue or a balanced flue, which gives amazing flexibility when installing into limited or odd-shaped spaces. Some gas Agas come with the new remote control AIMS system, via which you’ll save up to 20% on energy costs. An Aga with a couple of ovens, that doesn’t heat your water, uses about 340 KW per week, or 48L or Propane, including AIMS savings. With water heating the energy use increases to about 601 KW or 84L of Propane. A three oven no-hot-water Aga uses about 340 KW a week, 48L of Propane. The four oven family favourite uses around 422 KW a week without heating the water, 60L of Propane. With water heating included it uses roughly 718 KW a week, 101 litres of Propane.

The oil fired Aga is very similar to the original oil Aga from the ’50s, first released in 1959. Obviously they’ve tinkered with the design and technical stuff to make sure it’s as good as it can be. But otherwise it’s the same well loved oil burning Aga as ever. The oil Aga’s vaporising burner is regulated by state of the art thermostats so it’s known for energy efficiency. An Aga with two ovens, that doesn’t provide hot water, consumes around 40L oil per week. The same model with heated water uses around 60L a week. A model with 4 ovens and no hot water consumes around 51L a week, rising to 68L a week when hot water’s included.

For comprehensive information on Aga cookers, call Edwards & Godding on 01189 939 046

Article Source: http://EzineArticles.com/?expert=Robert_Craythorne

Article Source: http://EzineArticles.com/5842119


Share

Aga Cookers – The S Series – Unconventionally Beautiful!

There’s an Aga cooker for every kitchen. And one for every cook. The S series is causing an ongoing stir with its unconventional angle on conventional cooking. There’s the gorgeous Aga Masterchef series, a joy for foodies everywhere. And there’s AGA Modules, a nifty solution that delivers complete cooking flexibility.

If you’re after a classic heat storage cooker, you can’t go far wrong. There’s a choice of two, three and four oven models, all of which run just as cleanly and efficiently on natural gas, propane or oil – either Kerosene or diesel. Aga’s conventional cooker, the S series, has made a big splash in the media for exceeding people’s expectations on reliability, performance and style. And the Aga Integrated Module and Freestanding Module – previously called the ‘Companion’ – offers the same superb cooking versatility as ever. Reliable good looks. A clever mix of conventional electric oven, integral grill and electric fan oven. Plus a choice of either a free standing or attached hot plate.

If you’re concerned with green issues, you’ll find Aga is hot on the heels of the latest developments in greener cooking technologies. But there’s more. On a simple, practical level once you have an Aga cooker you’ll be able to get rid of a whole load of other gadgets and save even more cash on energy. Aga cookers make lovely, crunchy toast and succulent toasted sandwiches, so you can ditch your toaster and bury your Breville! There’s no need for an electric kettle – a range cooker will boil your kettle much faster. You won’t need a bulky, ugly electric bread making machine because Agas are renowned worldwide for turning out mouth-wateringly fragrant hand baked breads and cakes. Your tumble drier becomes redundant and there’s no more need for radiators in your kitchen… or in the surrounding rooms.

How many miles does an Aga travel? The Aga cooker is made right here in the UK so although it’s heavy, it doesn’t have to travel far. As well as employing a whole load of highly skilled people in otherwise sleepy Shropshire, the company has shelled out a grand £7 million so far to ensure carbon and other emissions from the foundry are cut to the bone. In fact it’s so important to the local area and the nation’s industrial history that the Aga cookers factory has been named a UN World Heritage site!

If you are seeking advice about Aga cookers, or what just like to find out more about how an Aga could transform your kitchen, call Edwards & Godding on 01189 393 046.

Article Source: http://EzineArticles.com/?expert=Robert_Craythorne

Article Source: http://EzineArticles.com/5941608


Share

Aga Cooker – Cooking Christmas Dinner On An Aga Cooker

An Aga Cooker is an amazing cooker at the best of times, however when Christmas comes around it really comes into it’s own. Just imagine; it’s Christmas Eve and you have made your list of Christmas food, possibly prepared vegetables and got all the pans ready for the Christmas day cooking marathon to come.

If you were to use a normal cooker or even a range cooker the chances are that you will have to slave over it for most of Christmas morning, however, if you were to be lucky enough to own an Aga cooker the chances are that most of the hard work will happen in the background whilst you are free to enjoy Christmas morning with the family.

Once you have prepared the turkey all you want to do is get it into the oven and cook it, however to do that and still be able to eat it hot, without the dreaded re-heat, can be a problem. The other struggle you will face when cooking it on Christmas morning is oven space, or should I say, the lack of it. Assuming you will be cooking roast potatoes, sage and onion stuffing and possibly three other vegetables it is likely that unless you have at least two ovens it will be difficult to cook them at the same time.

Working with an Aga cooker is simply a breeze as the four ovens are all continuously at temperature, so there is no waiting for them to heat up, and as they are all at different temperatures you can move food around making sure that it is not overcooked but is always kept warm.

The secret ingredient when cooking Christmas dinner on the Aga cooker is the warming oven, this is where you would normally warm plates or cook food as you would in a slow cooker. If you are looking to reduce the stress of cooking the turkey on Christmas morning use the warming oven, as it operates at a low temperature, you put the turkey into a tray and slip it into the oven before retiring to bed; it will gently cook for around eight hours and then in the morning you will be amazed to see that it is cooked perfectly. You will simply have to brown it a little and it will be ready to serve.

Cooking it this way will also free up space in the roasting oven for the roast potatoes and other vegetables. The trick is planning ahead and you manage your precious time and lessen the stress of cooking the Christmas dinner. The Aga cooker also has the added benefit that no matter how much spillage you have you won’t have to clean it up as the constant heat burns it off.

Arnold Hexden is known for his interesting articles such as Range cookers and cooking. Find out more with Range Cooker [http://www.rangecookerauctions.co.uk/Aga-Cooker-Cooking-Christmas-Dinner-On-An-Aga-Cooker.html] Why not check out the best prices for range cookers at [http://www.rangecookerauctions.co.uk]

Article Source: http://EzineArticles.com/?expert=Arnold_Hexden

Article Source: http://EzineArticles.com/876728


Share